Save It
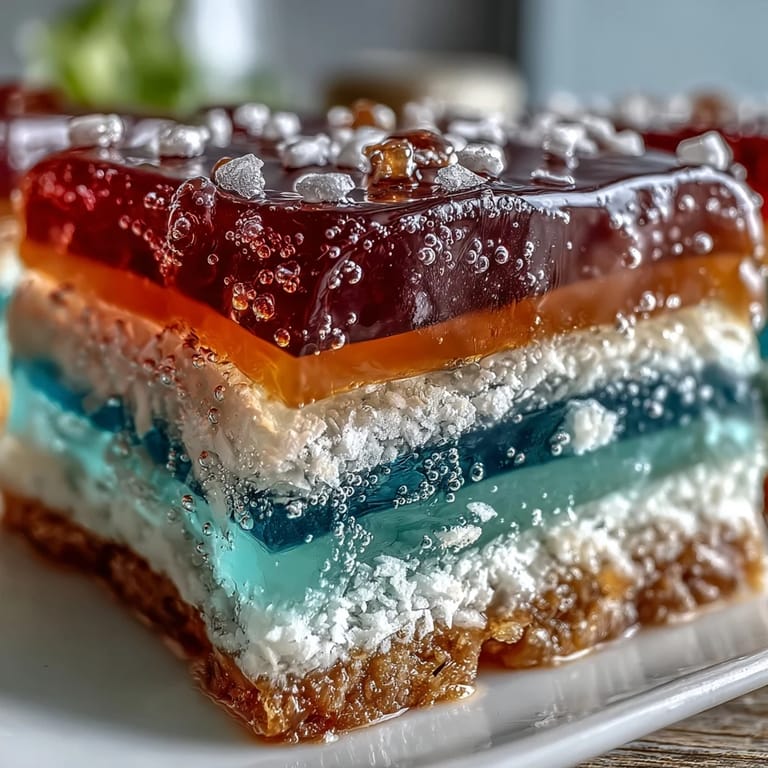
 The first time I made this Rainbow Jelly Cake, the kitchen was suddenly cheerful; each bowl of colored jelly turned the countertop into a painter’s palette. The glossy blues and sunset oranges shimmered beneath the fluorescent light. It felt less like baking and more like crafting something joyful, especially when the coconut cream’s gentle aroma mingled with all the fruitless colors. While the recipe seemed precise, the urge to improvise with hues and flavors was irresistible. Who knew agar-agar could become such a canvas?
I still remember the way my neighbor’s daughter, usually so shy, brightened when I served this at our block’s summer picnic. She asked if she could take an extra piece home, just because the colors made her think of her favorite crayons. Sharing it that day, I realized how easily food can spark small conversations and unexpected smiles.
Ingredients
- Agar-Agar Powder: Sets up into a perfectly firm, sliceable jelly—always dissolve thoroughly for a smooth result.
- Water: The foundation that lets the colors shine bright—cold tap water is fine, just measure carefully.
- Granulated Sugar: Balances the slight bitterness in agar-agar, so don’t skimp if you want kids to love it.
- Food Colorings (Red, Orange, Yellow, Green, Blue, Purple): Go bold or gentle—start slow, since colors deepen as they set.
- Vanilla Extract (optional): Adds a homey warmth—sometimes I swap it for a drop of pandan or rose for fun.
- Coconut Cream: Brings lush creamy flavor that contrasts the bright jelly—give the can a good shake before opening.
- Pinch of Salt: Quietly sharpens the richness of the coconut and sweetness of the jelly.
Tired of Takeout? 🥡
Get 10 meals you can make faster than delivery arrives. Seriously.
One email. No spam. Unsubscribe anytime.
Instructions
- Mix the Jelly Base:
- Stir the agar-agar powder and water together in your saucepan, listening for that grainy scratch at first, then a quiet simmer as it dissolves. Sprinkle in the sugar and vanilla and stir until everything turns glossy and clear.
- Create Colorful Layers:
- Divide the syrupy mixture into six bowls—the kitchen will look like an art class gone right. Tint each with a drop or two of food coloring, swirling gently until vibrant.
- Layer and Set:
- Pour the first colored jelly into your mold, then wait a few minutes—touch gently, it should wobble but not stick to your finger. Continue with each color, layering patiently, and notice how the kitchen grows quieter as everyone watches the stripes form.
- Make Coconut Cream Topping:
- Combine agar-agar powder, water, and coconut cream in a clean pan; heat slowly until smooth and steamy. Sugar and a pinch of salt melt in, and the tropical scent will float through everything.
- Add Creamy Finale:
- Gently pour coconut cream mixture atop the chilly rainbow, careful not to break the stripes. You’ll see a swirling cloudiness settle into something beautifully solid.
- Chill Until Set:
- Move the mold to the fridge and let it rest for at least an hour, resisting the urge to peek too soon.
- Unmold and Serve:
- Run a thin knife along the edges—when it releases with a soft peel, turn it out onto your plate and slice into bright mosaic slabs.
 Save It
 The day my partner declared this his new favorite dessert, he’d just come home late from work and found the chilled jelly waiting on the bottom shelf of the fridge. I didn’t expect anything except a quick snack, but he sat on the kitchen stool, admiring each slice before that first chilled, coconut-sweet bite.
Troubleshooting Tricky Layers
Sometimes the trickiest bit is waiting for each layer to firm up—too soon, and you lose the stripes, too late and you risk a dry top. Testing lightly with the back of a spoon becomes a ritual, and it’s worth it for that flawless stack. If your jelly is stubbornly sticking to the mold, dip the bottom in warm water for ten seconds—just enough to loosen, not melt. And yes, slightly uneven lines give it character.
Choosing and Using Coconut Cream
All coconut creams are not created equal; some are richer, others a touch watery. I’ve found that shaking the tin before opening and stirring once more after pouring out ensures even texture. If you want a subtler coconut profile, swap half for light coconut milk. A pinch of salt can lift the flavor from flat to fabulous in a snap.
Jazzing Up Your Jelly Cake
Sometimes I add a hint of pandan or rose for a Southeast Asian twist—just a drop or two in the jelly base does the trick. Garnishing with shredded coconut or fruit slices gives it extra flair and boosts the summer vibes. Leftovers rarely linger, but if they do, rainbow cubes make colorful lunchbox treats.
- If you’re short on time, use fewer layers for a striped effect.
- Natural food colors look gorgeous and won’t stain your hands.
- Be sure all bowls and tools are fully dry—water drops cause streaky layers.
 Save It
 Rainbow Jelly Cake always disappears fast, but it’s the color and care that people remember most. I hope you have as much fun shaping each layer as I did—sometimes the simplest desserts feel like a small celebration.
Recipe FAQs
- → How does agar-agar differ from gelatin?
Agar-agar is plant-based and sets firmer at room temperature than gelatin. It needs to be boiled to dissolve fully and produces a slightly more brittle, glossy gel ideal for layered jellies.
- → How long should each layer set before adding the next?
Let each colored layer cool until just set — typically 5–8 minutes in a shallow mold. It should hold shape but still be tacky so the next layer bonds without melting the one below.
- → Can I prevent colors from bleeding between layers?
Allow layers to become just firm, not hot, before pouring the next. Pour gently down a spatula or the back of a spoon to diffuse the flow and reduce splashing that causes bleeding.
- → Why did my coconut layer separate or weep?
If the coconut mixture is overheated or the ratio of fat to water is off, separation can occur. Warm gently, whisk thoroughly until smooth, and pour when slightly cooled to avoid breaking the gel surface.
- → What molds work best for even layers?
Shallow rectangular or round molds (about 20 cm diameter) give even, thin layers that set quickly and are easy to slice. Use a level surface in the fridge while chilling.
- → How long does this keep and how should it be stored?
Cover and refrigerate for up to 3 days. Keep chilled and wrapped to prevent the surface from drying or absorbing other fridge aromas.