Save It
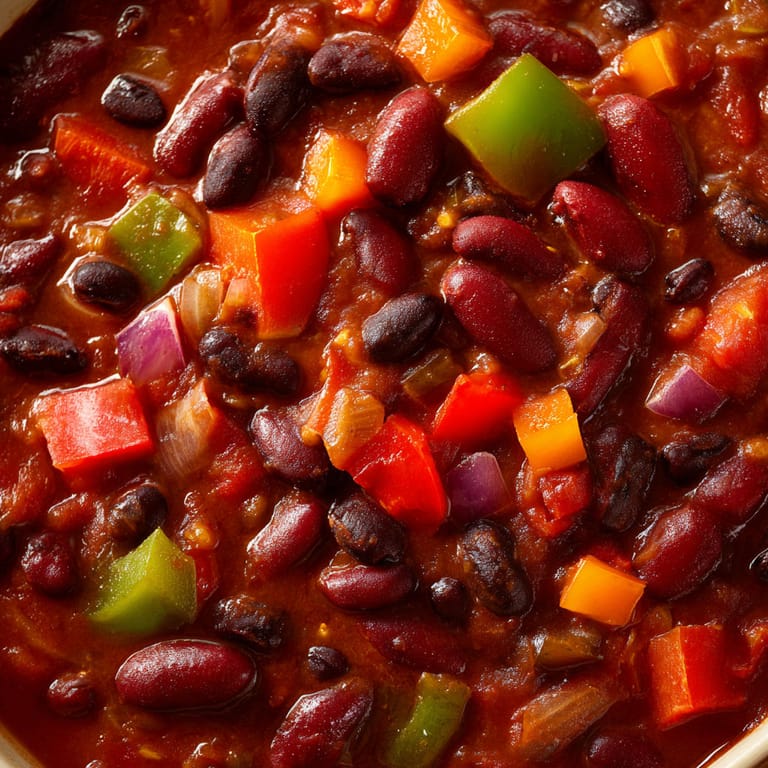
 This smoky and hearty vegetarian chili is my secret weapon for busy weeknights and lazy Sundays alike. Packed with beans and colorful vegetables, it makes a massive batch that I rely on for quick lunches and freezer-friendly dinners. If you want comfort food that tastes even better the next day, this is for you.
I first made a double batch of this chili before my youngest started school. It became my go-to for chilly nights when I needed something nourishing but low-effort.
Ingredients
- Black beans canned: Essential for protein and creaminess Choose low-sodium beans if possible or rinse well
- Kidney beans canned: Adds variety and hearty texture Look for cans without added sugar
- Diced tomatoes canned: Provides acidity and body Go for fire-roasted if available for extra flavor
- Bell pepper diced: Brings sweetness and color Choose a firm pepper with shiny skin
- Onion diced: Creates a savory backbone Pick a heavy onion with dry papery skin
- Garlic minced: Boosts depth and aromatic flavor Use fresh cloves for the best taste
- Chili powder: Adds warmth and gentle heat Choose a fresh-smelling powder for best results
- Cumin: Deepens earthiness Whole seeds toasted and ground give extra flavor but powder works just fine
- Smoked paprika: Infuses a smoky nuance Spanish varieties are especially rich
- Salt and pepper: Balances flavors Always taste and adjust at the end
Tired of Takeout? 🥡
Get 10 meals you can make faster than delivery arrives. Seriously.
One email. No spam. Unsubscribe anytime.
Instructions
- Sauté the Aromatics:
- Add diced onions bell pepper and garlic to a large heavy-bottomed pot over medium heat Stir regularly and cook for about ten minutes until the onions become golden and translucent This slow sauté is really important for developing the chili’s underlying flavor
- Spice It Up:
- Sprinkle in chili powder cumin and smoked paprika Stir constantly for one minute to toast the spices This helps release their oils and adds an irresistible aroma to the whole dish
- Build the Chili:
- Add canned black beans kidney beans and diced tomatoes to the pot Stir everything together and be sure to scrape any flavorful bits from the bottom Cover and bring to a gentle simmer Cook uncovered for about twenty minutes stirring occasionally so nothing sticks to the bottom
- Season and Finish:
- Taste and add salt and pepper as needed Simmer five extra minutes to let the flavors meld If you like a thicker chili mash some of the beans with a ladle against the pot’s side
- Cool and Store:
- Remove the pot from heat Allow the chili to cool for at least thirty minutes before portioning into freezer-safe bags or containers Seal them well and label Put in the freezer for easy grab-and-go meals later
 Save It
 My favorite ingredient here is smoked paprika It gives that rich campfire flavor without any meat My kids always guess it is from bacon and it has become a fun family challenge to keep them stumped
Storage Tips
Freeze portions flat in zip-top bags for quick thawing I like to freeze two or three servings per bag so they stack easily in the freezer and defrost overnight in the refrigerator They reheat quickly in the microwave or on the stove
Ingredient Substitutions
Swap pinto or white beans for any of the beans listed if needed You can also throw in corn or diced zucchini for more veggies If you want a deeper sauce add a tablespoon of tomato paste
Serving Suggestions
Top with sliced avocado or a dollop of plant-based sour cream A handful of cilantro or finely chopped scallion adds brightness For more warmth stir in a pinch of cayenne or hot sauce before serving
Cultural Context
Chili has a long history traced to the American Southwest and evolved as a communal comfort food Since it can be made without meat and relies on shelf-stable ingredients it is a staple for vegetarians and anyone who loves budget-friendly one-pot meals
Seasonal Adaptations
Bell peppers are best in late summer and early fall when they are sweetest In winter sub in diced sweet potato or butternut squash for a heartier stew Use frozen corn or spinach in spring for extra color and vitamins A few helpful notes to keep in mind Chili thickens as it cools so add a splash of water when reheating Rinsing canned beans removes extra salt and starch Let chili rest before freezing for the best texture
Success Stories
Last fall after a very busy week I pulled this chili from my freezer for a book club dinner Everyone ended up requesting the recipe It is now a regular in three of my friends’ homes and one claims her picky eater requested seconds
Freezer Meal Conversion
This chili makes the easiest freezer meal Cool the batch completely then divide into reheatable containers or bags Press out as much air as possible to avoid freezer burn Thaw in the fridge overnight or reheat directly from frozen on the stove with a splash of water
Save It A little extra time at the beginning makes all the difference for flavor. Freeze in small portions for ultimate weeknight convenience.
Recipe FAQs
- → Can I use different types of beans?
Yes, feel free to substitute with pinto, cannellini, or chickpeas according to your preference or pantry items.
- → How do I freeze and reheat the chili?
Let the chili cool completely, then transfer to freezer-safe bags or containers. Reheat on the stovetop or microwave until hot.
- → Can I add extra vegetables?
Absolutely! Zucchini, corn, or carrots pair well and boost nutrition and flavor in the chili.
- → What can I serve with this chili?
Enjoy with crusty bread, rice, or tortilla chips. Toppings like avocado, sour cream, or cheese work great too.
- → How long will the chili last in the freezer?
Properly stored, the chili will keep well frozen for up to three months without losing flavor.