 Save It
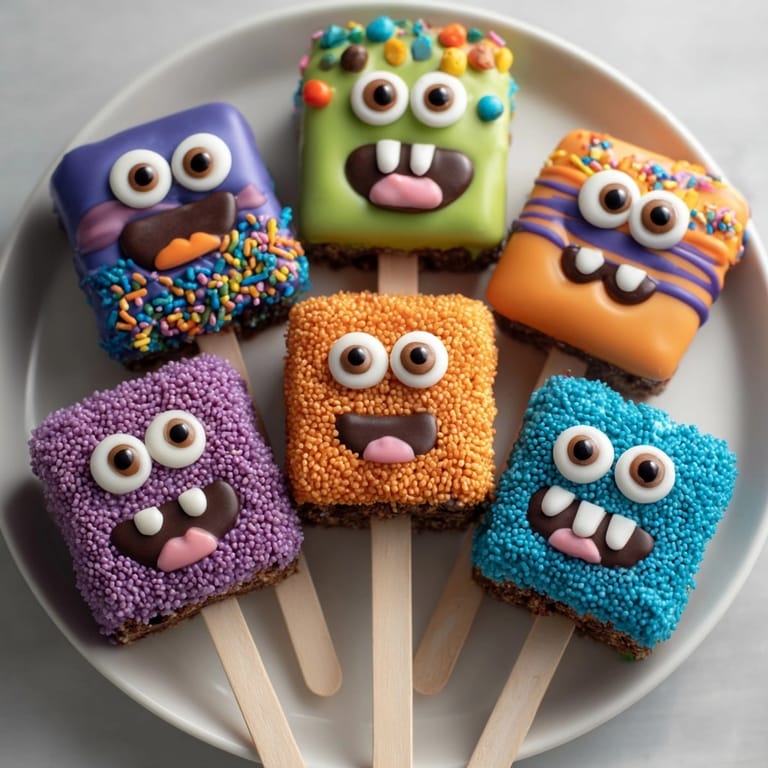
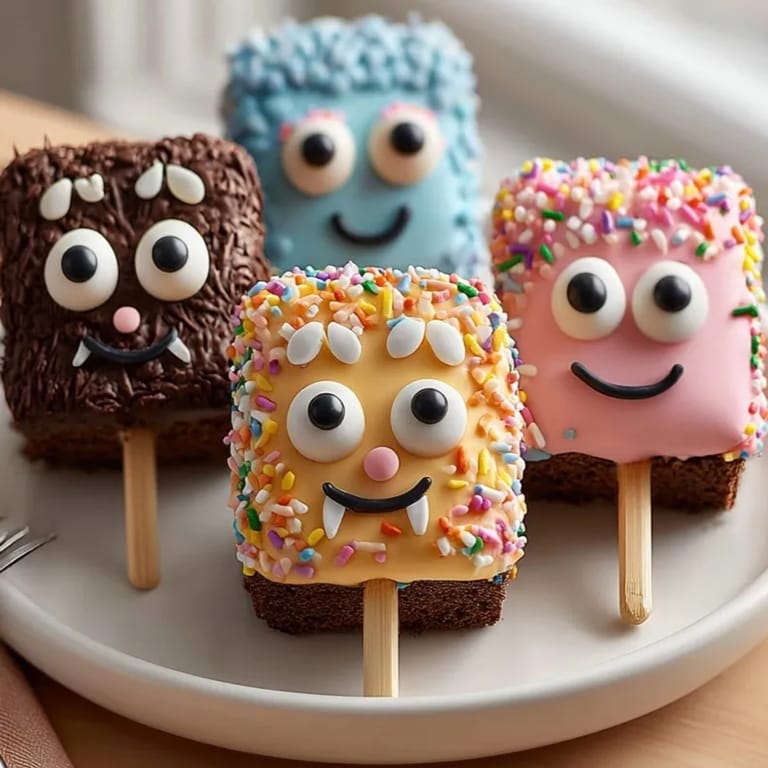
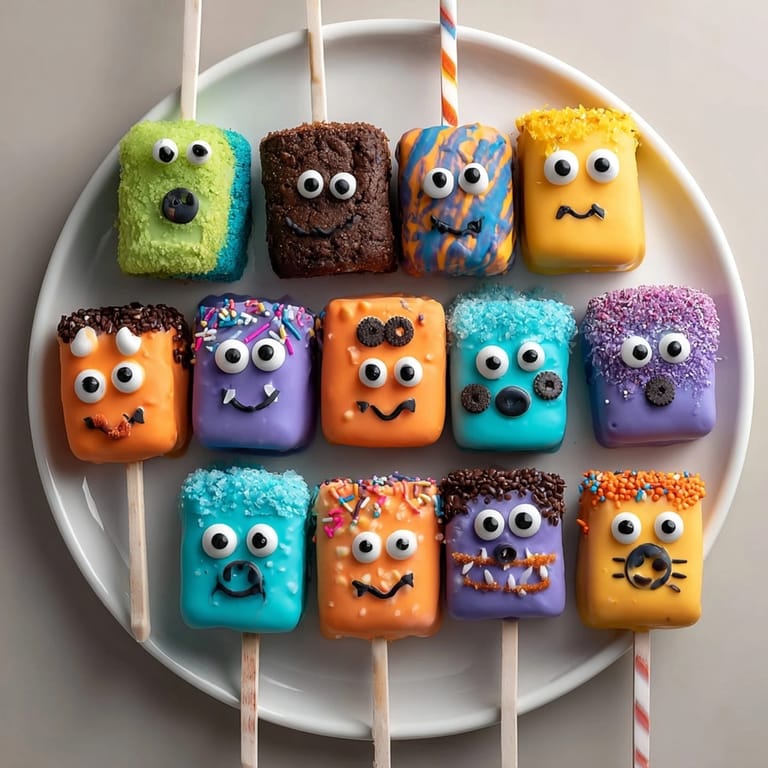
 These bright and silly Monster Brownie Pops always steal the show at birthday parties and Halloween gatherings. They are simple to make but pack major fun with their playful candy eyes and bold colors. Each fudgy brownie square transforms into a grinning monster with just a quick dip and sprinkle, making this a perfect baking project for kids or a treat to wow your guests.
The first time I made these pops my niece and nephew spent forever giggling about who created the silliest monster. Now they request this treat every time they come over even when it is not Halloween season.
Ingredients
- Unsalted butter: gives rich fudgy texture to the brownies and helps them set up nicely for dipping so choose high-quality butter for the best flavor.
- Granulated sugar: provides balanced sweetness and helps keep the brownie square moist. An ultra-fine sugar works best for a smooth batter.
- Large eggs: bind everything together and contribute to that chewy consistency we all love. Freshness makes a big difference.
- Vanilla extract: rounds out cocoa's bitterness and deepens brownie flavor. Pure vanilla is worth the switch from imitation here.
- Unsweetened cocoa powder: delivers the chocolate punch. Seek out a brand with deep color for bold flavor and vibrant monster pops.
- All-purpose flour: sets the structure so brownies hold on the stick. Sift before adding for lump-free pops.
- Salt: balances sweetness and amplifies all flavors in the pop. Fine sea salt is my pick for even distribution.
- Baking powder: creates a little lift without making the brownies cakey. Ensure it is fresh for best results.
- Candy melts: in a rainbow of colors create that monster look. Fresh candy melts will give smoother coating and brighter hues.
- Candy eyes: come in all sizes. Bigger eyes are extra silly but mix in minis for surprise expressions.
- Assorted sprinkles mini chocolate chips colored sugar: help make each monster unique. Pick a variety for the most fun decorating.
- Lollipop sticks: are essential for pops. Sturdy sticks keep monsters upright so double-check quality before assembling.
Tired of Takeout? 🥡
Get 10 meals you can make faster than delivery arrives. Seriously.
One email. No spam. Unsubscribe anytime.
Instructions
- Prepare the Pan and Oven:
- Line your eight inch square pan with parchment paper making sure there is extra overhang for easy lifting. Preheat the oven to three hundred fifty degrees Fahrenheit for even baking. This step ensures you can remove unbroken brownies for perfect pops every time.
- Mix the Wet Ingredients:
- In a microwave safe bowl melt the unsalted butter in thirty second intervals. Stir the melted butter until smooth then whisk in the sugar eggs and vanilla extract. Mix vigorously until glossy and unified. This creates a fudgy base and helps dissolve the sugar.
- Incorporate the Dry Ingredients:
- Sift cocoa powder all-purpose flour salt and baking powder over your wet mixture. Fold in with a spatula until just combined. Avoid over-mixing so the texture stays soft. Sifting here prevents lumps for a smooth batter.
- Bake the Brownies:
- Pour your brownie batter into the lined pan and spread evenly. Bake for twenty to twenty five minutes watching closely near the end. Insert a toothpick in the center—moist crumbs mean perfect fudgy brownies. Err on the side of underbaked rather than dry.
- Cool and Cut:
- Let brownies cool completely in the pan for clean squares. Lift out using the parchment overhang and slice evenly into sixteen squares. Precision ensures all pops are the same size. If brownies seem very soft chill them for twenty minutes for easier handling.
- Insert Sticks:
- Gently insert a lollipop stick into each brownie square pushing slowly to avoid cracks. If needed chill the brownies briefly to firm them up. This step is crucial so monsters stay put while decorating.
- Melt the Candy Coating:
- Melt your candy melts in microwave or double boiler using short bursts and stirring well. Temperature control prevents burning and ensures shiny coating. Pick a few different colors for variety.
- Dip and Decorate:
- Dip each brownie pop fully into melted candy turning gently for a thick even coat. Tap off any excess to avoid pooling. Before the coating sets decorate quickly with eyes sprinkles and toppings making each one playful and unique.
- Set and Serve:
- Place decorated pops on parchment paper and let them set till the coating hardens. Once firm these pops are ready to display and enjoy. They are sturdy enough for a party platter or to hand out as edible favors.
 Save It
 One year I let everyone decorate their own monster and my brother insisted on making one with eight googly eyes. Sometimes the decorating step is just as fun as eating. The googly-eyed pops always become the party favorite.
Storage Tips
Store the finished brownie pops in an airtight container at room temperature for up to three days. If your kitchen is warm you can keep them in the refrigerator but bring to room temp before serving so the coating does not crack. Avoid stacking decorated pops directly on top of each other. Layer parchment between them if needed. Brownie squares can be baked ahead and frozen without decorations for up to two months. Thaw fully before dipping and decorating.
Ingredient Substitutions
A gluten free flour blend works well for those avoiding wheat. Check that baking powder is gluten free too. Swap butter for plant-based alternatives if you want dairy free treats. Refrigerate before dipping as plant-based brownies tend to be softer. Try different candy melt shades or tint plain white melts using oil-based food colors for custom events.
Serving Suggestions
Pile monster pops upright in a mason jar for a colorful centerpiece. Arrange on a cake stand with dry ice and colored napkins for a dramatic Halloween effect. Wrap individually with cellophane and ribbon for goodie bags or party favors.
Cultural and Holiday Context
Monster brownies are a playful riff on classic American party pops with roots in the tradition of lollipop style desserts. Their monster makeover makes them perfect for Halloween but no one complains when you serve your pops at summer birthday parties or classroom events.
Seasonal Adaptations
Switch to pastel candy melts and bunny eyes for spring celebrations Use red and green colors plus festive sprinkles for winter holidays Add sunshades or fruit shaped eyes for a pool party vibe
Success Stories
Families love these because even the tiniest hands can help coat and decorate. Teachers report kids flock to the treat table when these monsters appear. They spark friendly face-pulling competitions and always get snapped up first at school parties.
Freezer Meal Conversion
Freeze undecorated brownie squares layered with parchment for easy party prep. You can decorate right from the freezer—just let pops reach room temperature before dipping in candy melts to avoid condensation that makes coating slide off.
 Save It
 Monster Brownie Pops guarantee squeals of delight and happy faces at any event. Get creative with colors and toppings for treats as fun as they are tasty.