 Save It
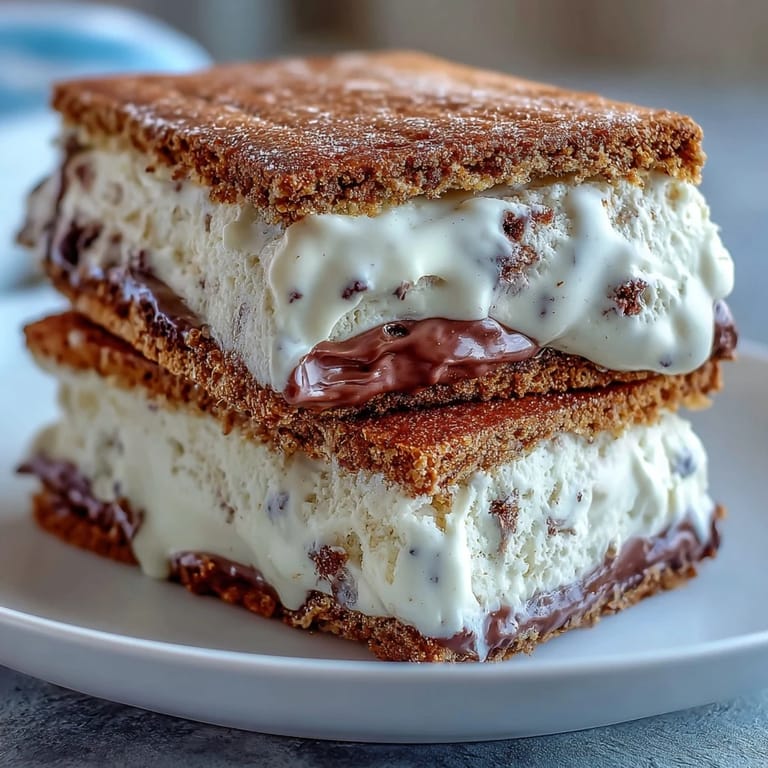
 Last summer, I was obsessed with those vanilla frappuccinos from the coffee shop down the street, ordering one almost daily until my wallet staged an intervention. One sticky afternoon, standing in my kitchen with melting ice cream and a half-eaten cookie, it hit me: why not make this myself? The result was these ice cream sandwiches, where creamy vanilla bean ice cream gets hugged by rich espresso cookies that taste like a frozen coffee shop dream. They became my answer to those expensive drinks, and honestly, they're so much better.
My neighbor Sarah came over on the hottest day of August, complaining about the heat, and I handed her one of these straight from the freezer. She took one bite and her whole expression changed, like she'd just discovered something she didn't know she needed. She ended up staying for three more, and now she texts me every summer asking if I'm making a batch. That's when I knew this recipe was a keeper.
Ingredients
- Unsalted butter, softened (1 cup): This is your foundation for cookies that actually taste homemade and not like the box mix version. Softened means it should yield to a gentle poke, not melted into puddles.
- Brown sugar and granulated sugar (1 cup plus 1/2 cup): The brown sugar adds that deep molasses note that plays beautifully with espresso, while the granulated keeps the cookies from becoming cake-like.
- Large eggs (2): Room temperature eggs blend better and create a smoother dough without deflating your cookie dreams.
- Vanilla extract (2 tsp): Don't cheap out here because you're tasting it directly against the espresso and vanilla bean.
- All-purpose flour (2 1/2 cups): Measure by weight if you have a scale, because scooping directly from the bag can pack it too densely and mess with your texture.
- Unsweetened cocoa powder (1/2 cup): This adds richness and depth to the cookies, complementing the espresso without making them taste like chocolate.
- Instant espresso powder (2 tbsp): This is the secret weapon that makes people say, "Wait, is this from a café?" Don't skip it or dilute it.
- Baking soda and salt (1 tsp and 1/2 tsp): These seem minor but they're what give the cookies their slightly crispy edges and prevent them from tasting flat.
- Heavy cream and whole milk (2 cups and 1 cup): The ratio matters here because you want ice cream that's creamy but still scoopable when frozen.
- Granulated sugar for ice cream (3/4 cup): This sweetens the base and helps with the texture when churned.
- Vanilla bean or paste (1 bean or 2 tsp paste): A real vanilla bean gives you those little speckles and an aromatic quality that elevates the entire experience.
- Pinch of salt: This tiny addition brightens the vanilla and makes every flavor pop.
Tired of Takeout? 🥡
Get 10 meals you can make faster than delivery arrives. Seriously.
One email. No spam. Unsubscribe anytime.
Instructions
- Make the ice cream base:
- Heat your milk, sugar, vanilla seeds, and salt in a saucepan over medium heat until the sugar dissolves and steam rises from the surface, watching carefully so it doesn't scald. You'll notice the mixture becoming slightly thicker and more fragrant, which tells you the vanilla is really releasing its essence.
- Cool and infuse:
- Remove from heat, discard the vanilla pod if you used a whole bean, then stir in the heavy cream and let it rest on the counter for a few minutes. The cold cream will shock the warm milk slightly, and that's exactly what you want.
- Chill thoroughly:
- Get this mixture as cold as possible in the refrigerator for at least two hours, or even better, overnight, because a cold base churns into smoother ice cream.
- Churn and set:
- Follow your ice cream maker's instructions, which usually takes about 20-25 minutes, then spread the soft-serve consistency onto a parchment-lined 9x13-inch pan about 1 inch thick. Freeze solid for at least two hours, or until a knife pressed into it doesn't easily sink through.
- Prep the oven:
- Preheat to 350°F and line two baking sheets with parchment paper so your cookies don't stick and brown unevenly.
- Cream the butter and sugars:
- Beat the softened butter with both sugars until the mixture turns pale and fluffy, about 2-3 minutes, which incorporates air that helps the cookies rise slightly. You'll know it's ready when it looks like wet sand has been transformed into something almost mousse-like.
- Add eggs and vanilla:
- Beat in one egg at a time so the mixture stays emulsified, then add vanilla extract and mix until combined.
- Combine dry ingredients:
- Whisk together the flour, cocoa powder, espresso powder, baking soda, and salt in a separate bowl to distribute the espresso powder evenly, because clumps of it will create weird bitter pockets.
- Bring it together:
- Fold the dry ingredients into the wet mixture just until combined, being careful not to overmix or you'll end up with tough cookies that taste like they spent too long in a gym bag.
- Roll out the dough:
- Divide the dough in half and roll each piece between two sheets of parchment to about 1/4 inch thickness, which is thinner than you'd think but crucial for getting that crispy-edged texture. If the dough springs back, let it rest for a few minutes and try again.
- Cut and bake:
- Use a 3-inch round cutter to cut out 16 cookies total, place them on your prepared sheets, and bake for 10-12 minutes until the edges are set but the centers still have a tiny bit of give. The cookies will firm up as they cool, so don't overbake them or they'll turn brittle.
- Cool completely:
- Let them cool on a wire rack until they're room temperature, which takes longer than you'd think but prevents them from falling apart during assembly.
- Cut the ice cream:
- Use the same 3-inch cutter to cut out eight rounds from your frozen ice cream slab, working quickly so the ice cream doesn't soften too much. Dip the cutter in warm water between cuts if it starts sticking.
- Assemble with care:
- Place each ice cream round between two cookies and press gently together, then immediately wrap each sandwich in parchment paper. The parchment insulates them so they don't melt during freezing and makes them easier to unwrap later.
- Final freeze:
- Freeze for at least one hour before serving, though overnight is even better because the flavors meld together beautifully.
 Save It
 One winter evening, I made a double batch and brought them to a dinner party expecting polite appreciation, but instead watched grown adults actually argue over who got the last one. That's when I realized these weren't just a fancy homemade alternative to a coffee shop drink—they'd become the kind of thing people actually plan for.
The Espresso-Vanilla Flavor Balance
The magic in these sandwiches comes from how the espresso in the cookies plays off the vanilla bean ice cream, creating this conversation between bitter and sweet that somehow makes both flavors taste stronger. I learned this the hard way after making a batch where I accidentally used regular cocoa powder instead of unsweetened and wondered why everything tasted muddy. The espresso powder needs to be instant, not brewed coffee, because the direct powder gives you that intensity without adding extra liquid that would mess with your dough.
No Ice Cream Maker No Problem
Life happened one summer and I didn't have access to an ice cream maker for weeks, so I started freezing the ice cream base in a shallow dish, stirring it every 30 minutes until it reached soft-serve consistency. It took longer and required more attention, but honestly, the texture was almost better because I could control exactly how firm it became. The key is setting a timer so you actually remember to stir it and don't end up with a brick.
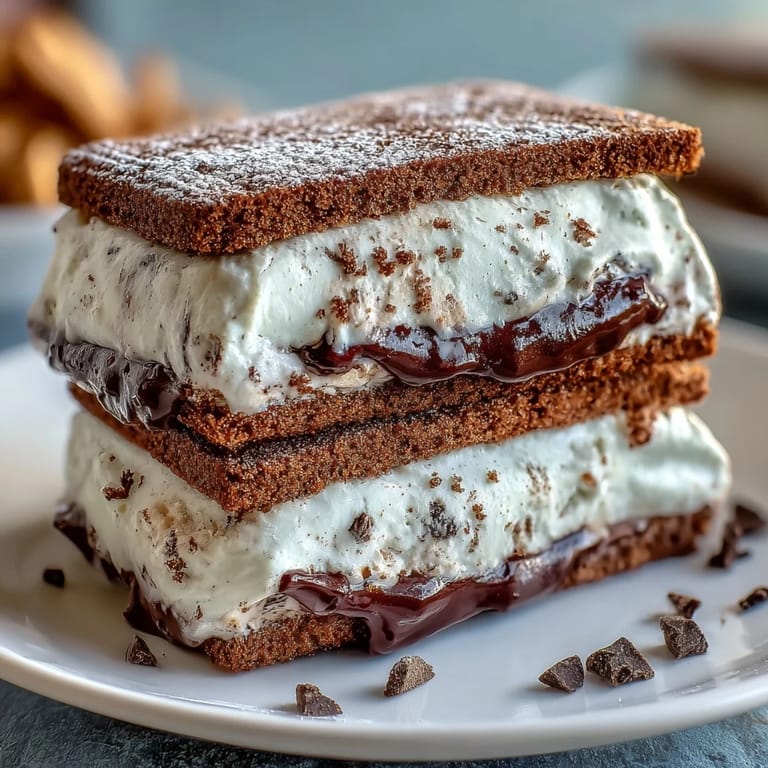
Making Them Your Own
Once you nail the basic recipe, these become a playground for experimentation and personal taste. I've rolled the edges in crushed espresso beans for extra drama, mixed mini chocolate chips into the cookie dough, and even tried a brown butter version that was dangerously good. The foundation is solid enough that it can handle your creative impulses without falling apart.
- Roll the sandwich edges in mini chocolate chips, crushed espresso beans, or even ground coffee for texture and flair.
- Make them ahead and store in the freezer for up to two weeks wrapped in parchment and sealed in an airtight container.
- Substitute store-bought vanilla bean ice cream if you're short on time, though homemade is truly worth the effort.
 Save It
 These ice cream sandwiches remind me that sometimes the best treats aren't the ones you wait in line for, but the ones you make in your own kitchen with a little patience and butter. Once you've made them once, you'll understand why I still crave them every single summer.
Recipe FAQs
- → How do I achieve the best vanilla flavor in the ice cream?
Use fresh vanilla beans or high-quality vanilla bean paste, scraping the seeds into the base for maximum flavor.
- → Can I make the espresso cookies ahead of time?
Yes, baking the cookies a day in advance allows the flavors to deepen and helps them maintain texture when assembled.
- → What if I don’t have an ice cream maker?
Freeze the vanilla mixture in a shallow dish, stirring every 30 minutes until firm and creamy.
- → How do I store the assembled sandwiches properly?
Wrap each sandwich in parchment paper and freeze at least an hour before serving to maintain shape and texture.
- → Are there any tips for extra texture?
Roll edges in mini chocolate chips or crushed espresso beans before freezing for added crunch.