 Save It
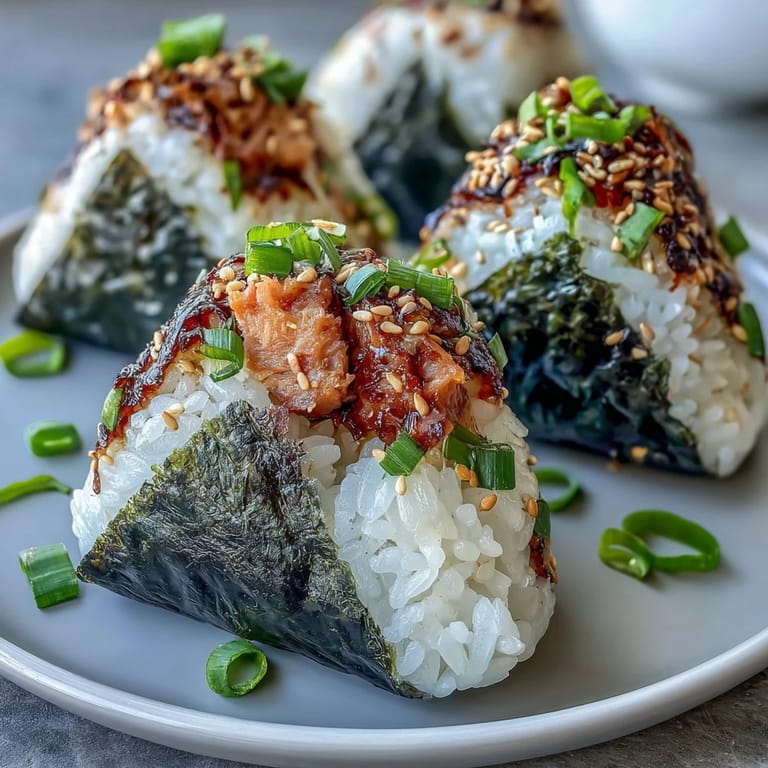
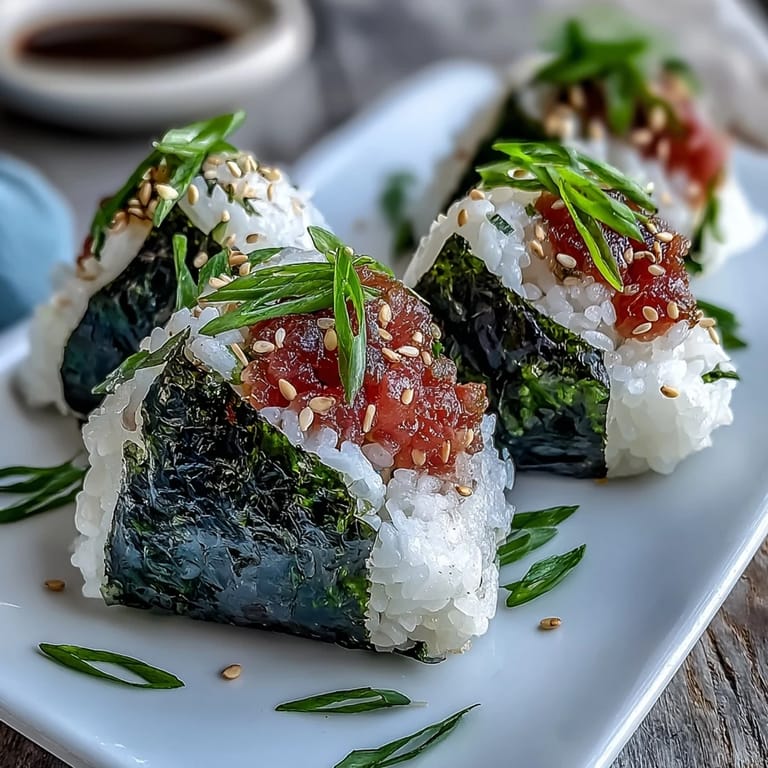
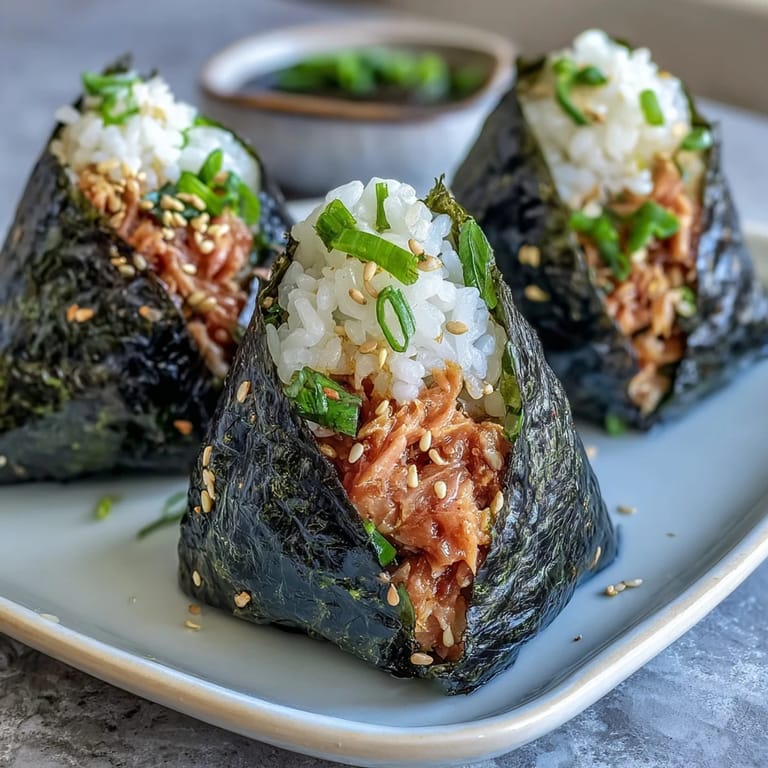
 My coworker Sarah brought spicy tuna onigiri to a team lunch, and I watched everyone stop mid-conversation to eat them. The way the nori crackled between your teeth, how that creamy spicy filling burst with umami—I was hooked immediately. What surprised me most was how she shaped them one-handed while chatting, like it was the easiest thing in the world. That afternoon, I went home and started experimenting, and now these rice balls are my go-to when I need something that feels fancy but takes barely forty minutes.
I made these for my friend's potluck last spring, and someone actually asked for the recipe before even tasting anything else—they just wanted to know why they looked so good. That moment made me realize onigiri are one of those dishes that look intentional and special even when they're simple, which is kind of the whole point of Japanese home cooking.
Ingredients
- Japanese short-grain rice (2 cups): This is non-negotiable because short-grain rice is stickier and holds together when you shape it; long-grain will crumble in your hands and leave you frustrated.
- Water (2 1/4 cups): The exact ratio matters more than you'd think, so measure carefully or use your rice cooker's water line.
- Rice vinegar (1 tablespoon): This adds a subtle tang that prevents the rice from tasting bland and keeps it from getting gummy.
- Sugar (1 teaspoon): Just a whisper of sweetness that balances the vinegar without making anything taste dessert-like.
- Salt (1/2 teaspoon for rice, plus more for shaping): Use flaky finishing salt for shaping because it won't dissolve into your hands as quickly as table salt.
- Canned or sushi-grade tuna (5 oz / 140 g): Canned tuna is convenient and works beautifully; raw tuna tastes more delicate and authentic if you can find sushi-grade.
- Kewpie mayonnaise (2 tablespoons): The Japanese version has a richer, slightly sweeter taste than American mayo, and honestly it makes a noticeable difference.
- Sriracha (1 teaspoon): Start here and taste as you go; spice preferences vary wildly, and you can always add more.
- Soy sauce (1 teaspoon): Use a quality brand because it's one of only a few ingredients in the filling.
- Sesame oil (1 teaspoon): This brings a toasted, nutty depth that ties everything together.
- Green onion (1, finely chopped): The fresh brightness cuts through the richness and adds a little textural contrast.
- Nori sheets (3, cut in half): Buy the good stuff from the Asian market if you can; cheap nori tastes papery and flavorless.
- Toasted sesame seeds (optional): They add a subtle crunch and look beautiful, but they're purely optional.
Tired of Takeout? 🥡
Get 10 meals you can make faster than delivery arrives. Seriously.
One email. No spam. Unsubscribe anytime.
Instructions
- Rinse and cook the rice:
- Run the rice under cold water, stirring gently with your fingers until the water runs almost clear—this removes the starch that would make everything pasty. Put it in your pot or rice cooker with the measured water and cook, then let it rest for ten minutes untouched so it finishes cooking with the residual heat.
- Season the rice:
- While it's still steaming, dissolve the vinegar, sugar, and salt in a tiny bowl, then gently fold it into the rice using a wooden spoon or rice paddle. Be patient here; rough stirring breaks the grains and makes mushy onigiri.
- Make the spicy tuna mixture:
- Combine your drained tuna, mayonnaise, Sriracha, soy sauce, sesame oil, and green onion in a bowl and mix until it looks cohesive. Taste a tiny bit on your finger and adjust the heat level because you're going to regret it if you don't.
- Prep your workspace:
- Set out a small bowl of water and another small bowl with salt nearby—these are your secret weapons for shaping without the rice sticking everywhere. Cool the rice to room temperature before you start shaping, or your hands will get too hot.
- Shape the onigiri:
- Wet your hands, sprinkle them with salt, and grab about 1/2 cup of rice and gently flatten it in your palm into a small disk. Place 1 to 2 teaspoons of the spicy tuna mixture in the center, then fold the rice up and around it and press gently into a triangle shape, using both hands.
- Wrap with nori:
- Take a strip of nori and wrap it around the bottom third of your onigiri so people have a place to hold it without getting rice all over their fingers. If you want, sprinkle a few toasted sesame seeds on top for looks and texture.
- Serve or store:
- Eat them right away while the nori is still slightly crispy, or wrap them tightly in plastic wrap and eat them within a few hours. They stay good in the fridge but taste best at room temperature.
 Save It
 My neighbor tasted one of these and told me it reminded her of a convenience store onigiri from Tokyo, which made me absurdly proud. Turns out homemade tastes better because you control how spicy it is and you use actual quality ingredients, which is kind of the whole story of cooking at home.
Choosing Your Tuna
Canned tuna is reliable and convenient, but if you can get sushi-grade raw tuna from a good fishmonger or Asian market, the flavor is delicate and buttery in a way that makes the whole thing feel more refined. The trade-off is that raw tuna costs more and you need to be confident about its freshness, so don't use it unless you're buying it specifically for this and eating it the same day.
The Rice Seasoning Secret
That rice vinegar and sugar mixture does something almost magical—it keeps the rice from drying out as it cools, adds a subtle sweetness that balances the spicy tuna, and gives the whole thing a faint umami quality that feels intentional. I learned this the hard way by making unseasoned onigiri first, and they were fine but forgettable; seasoned rice turns them into something memorable.
Storage and Make-Ahead Tips
These are best eaten fresh, but you can shape them ahead and wrap them individually in plastic wrap, then refrigerate for a few hours. The rice will firm up slightly and the flavors will actually blend together more, which is nice, but avoid wrapping them in nori until you're ready to eat because the seaweed will get soft and lose its crackle.
- Pack them unwrapped in a container and wrap each one in nori just before eating to keep the texture perfect.
- They're still tasty the next day eaten straight from the fridge, though the rice will be firmer and less fluffy.
- Don't store them in the fridge for more than a day because the rice starts to dry out and the filling can develop off-flavors.
 Save It
 These onigiri taught me that simple, portable food doesn't have to feel boring, and that mastering one small technique opens up a whole world of possibilities. Make a batch this weekend and taste what happens when you pay attention to the details.
Recipe FAQs
- → What type of rice works best for onigiri?
Japanese short-grain rice is ideal due to its sticky texture, which helps the onigiri hold its shape effectively.
- → Can I use raw tuna for the filling?
Yes, using sushi-grade raw tuna finely diced enhances freshness and flavor, but canned tuna is a convenient alternative.
- → How spicy is the filling and can it be adjusted?
The filling has a mild to moderate heat level due to sriracha, which can be reduced or omitted for a gentler spice.
- → How should onigiri be stored if not eaten immediately?
Wrap onigiri tightly in plastic wrap and refrigerate; consume within a day for best texture and taste.
- → What are good side pairings with spicy tuna onigiri?
Light accompaniments like miso soup or cucumber salad complement the spicy, savory flavors well.