 Save It
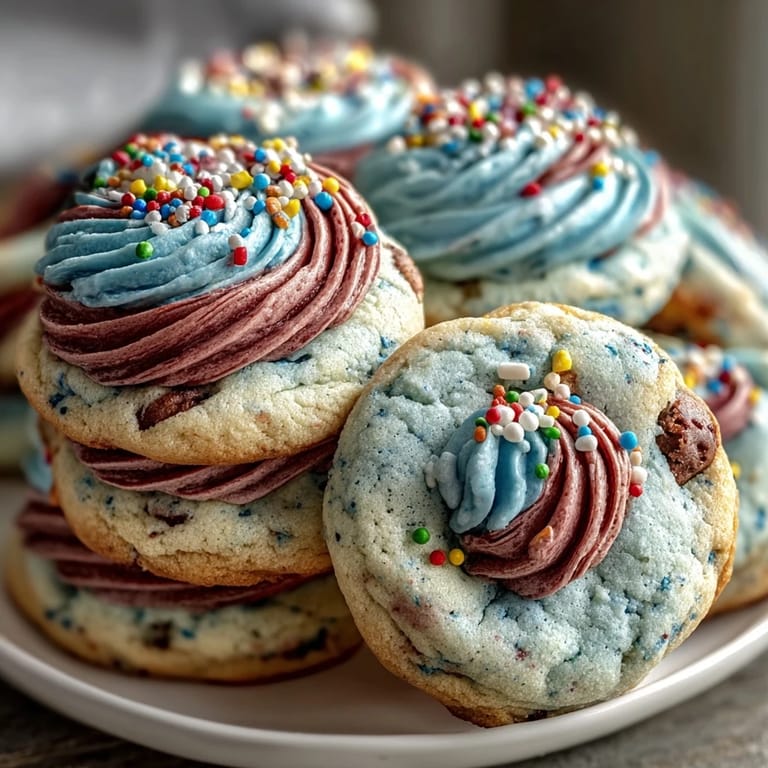
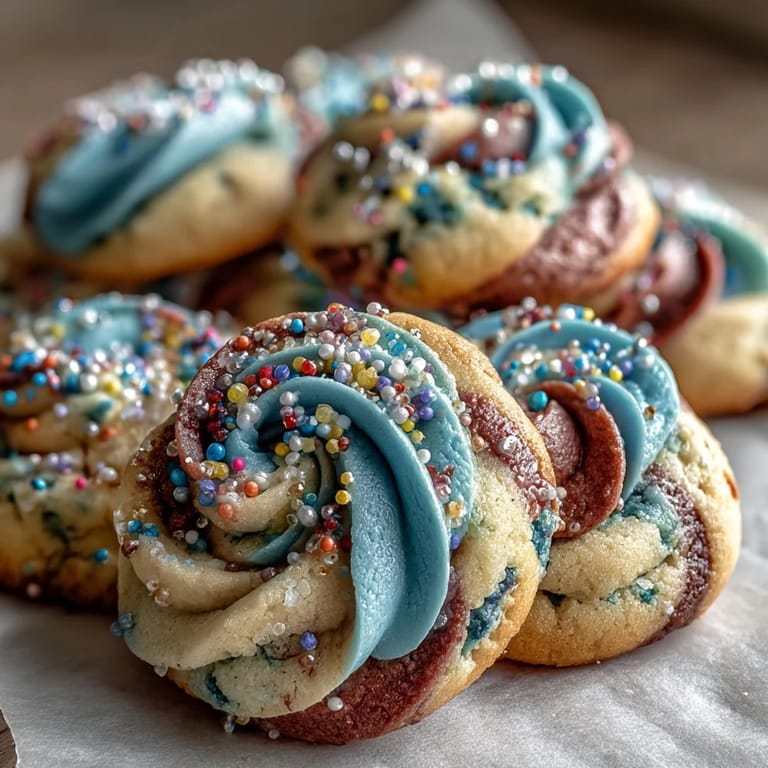
 My niece was turning seven and insisted on Cookie Run Kingdom cookies, those whimsical pastel creations she wouldn't stop talking about. I'd never attempted decorative dough swirls before, but watching her face light up when I pulled these from the oven made every careful twist worthwhile. The kitchen smelled like butter and vanilla, and somehow the whole afternoon felt like a small celebration just waiting to happen. These cookies became our tradition that year, and now I make them whenever someone needs a little extra joy on their birthday.
I remember standing in the kitchen with flour on my apron, phone propped up so my sister could watch the swirling technique in real time. She was convinced I'd mastered some fancy pastry skill, but really I was just twisting colored ropes like I was back in elementary school making clay snakes. That moment of pure simplicity, where the most complicated thing was picking which colors went together, reminded me why I love baking for people I care about.
Ingredients
- All-purpose flour (2 1/2 cups): The foundation of these cookies, and using the spoon-and-level method instead of scooping directly prevents packing flour in and making them tough.
- Unsalted butter (1 cup, room temperature): Room temperature is non-negotiable here because cold butter won't cream properly and you'll lose that tender crumb.
- Granulated sugar (1 cup): The sweetness balances the buttery richness, and creaming it thoroughly with the butter creates the light, tender texture these cookies need.
- Large egg (1): Brings richness and helps bind everything together without overdrying the dough.
- Pure vanilla extract (2 teaspoons) and almond extract (1/2 teaspoon, optional): These extracts add depth and prevent the cookies from tasting one-dimensional and plain.
- Baking powder (1/2 teaspoon): Just enough to give the cookies a subtle lift without making them cakey or fluffy.
- Salt (1/4 teaspoon): Enhances all the flavors and prevents the sweetness from becoming cloying.
- Gel food coloring in pastel shades: Gel coloring gives you those dreamy pastel hues without thinning the dough like liquid coloring does.
- Pastel sprinkles (1/4 cup): These are entirely optional but add a playful finishing touch that makes each cookie feel special.
Tired of Takeout? 🥡
Get 10 meals you can make faster than delivery arrives. Seriously.
One email. No spam. Unsubscribe anytime.
Instructions
- Mix your dry ingredients:
- Whisk the flour, baking powder, and salt together in a medium bowl and set it aside, so you're not scrambling when you need it. This step ensures the leavening is evenly distributed throughout.
- Cream butter and sugar into clouds:
- Beat them together for about 2 to 3 minutes until the mixture looks pale, light, and fluffy, like you're aiming for a cloud that's ready to float away. This aeration is what gives the cookies their tender, delicate crumb.
- Add your wet ingredients:
- Mix in the egg, vanilla extract, and almond extract if you're using it, beating just until everything is combined and smooth. Don't overbeat or you'll start developing gluten and toughen the dough.
- Bring wet and dry together gently:
- Gradually add the dry ingredients to the wet, mixing on low speed or by hand until just combined, then stop before you're tempted to mix more. Overmixing is the enemy of tender cookies, so resist that urge.
- Divide and tint your dough:
- Split the dough into 3 or 4 equal portions depending on how many colors you want, then work a small amount of gel food coloring into each portion by kneading gently. You'll be amazed at how little coloring you actually need for a beautiful pastel shade.
- Roll your colored ropes:
- Roll each colored dough portion into a rope about 12 inches long on your counter or a silicone mat, aiming for even thickness so they bake at the same rate. If you notice one rope is thicker than the others, take a moment to even it out.
- Create your signature swirl:
- Gather your colored ropes and gently twist them together, then continue rolling the twisted bundle into a single log, being careful not to overwork the colors together into mud. The looser and gentler you are with this step, the more defined and beautiful your swirls will remain.
- Chill for patience:
- Wrap your dough log in plastic wrap and refrigerate for at least 2 hours until it's completely firm and easy to slice cleanly. You can actually chill it overnight or even freeze it for weeks if life gets in the way.
- Preheat and prepare:
- When you're ready to bake, preheat your oven to 350°F and line your baking sheets with parchment paper so cleanup is effortless. Cold dough slices much more cleanly than room temperature dough, so keep your log chilled until the last moment.
- Slice with intention:
- Using a sharp knife, slice the chilled dough into 1/4-inch thick rounds, wiping the blade between cuts if necessary to keep the swirls looking pristine. Place each slice on your prepared baking sheets about 2 inches apart to allow for gentle spreading.
- Add your finishing touch:
- Top each cookie with a small pinch of pastel sprinkles if you'd like that extra festive flourish, pressing them very gently so they stick during baking. This step is purely decorative, so skip it if you prefer classic simplicity.
- Bake with watchfulness:
- Bake for 10 to 12 minutes, watching closely until the edges are just barely beginning to turn golden while the centers still look soft. The moment you see that golden kiss at the edges, it's time to pull them out because they'll continue cooking slightly on the hot pan.
- Cool with care:
- Let the cookies rest on the baking sheet for 5 minutes so they set slightly, then transfer them to a wire rack to cool completely. This resting period prevents them from breaking and helps them maintain their tender texture.
 Save It
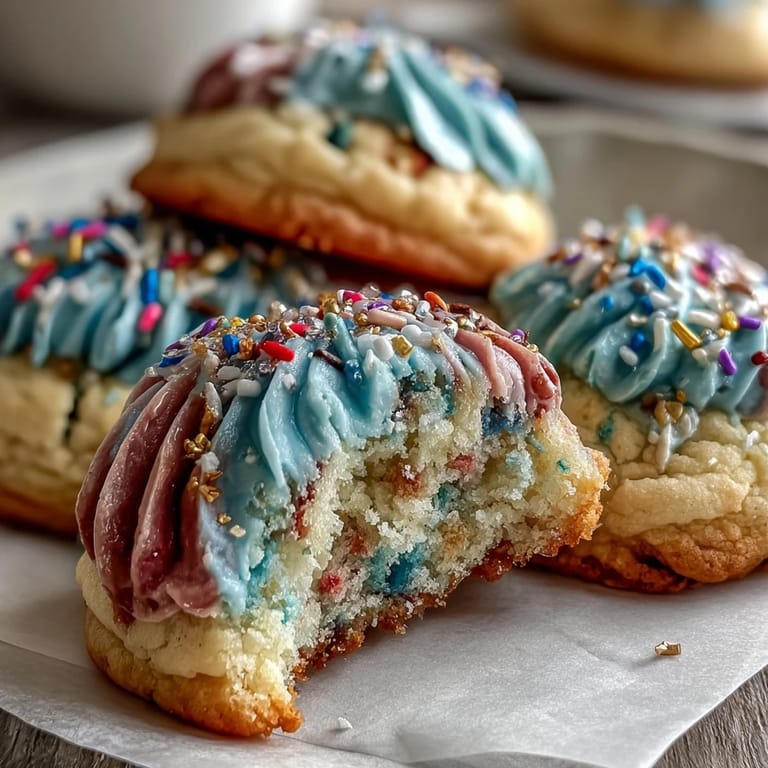
 There's something magical about the moment when you slice into that chilled log and see the pastel swirls perfectly preserved inside. My best friend brought her kids over and they gasped like I'd performed actual magic, which felt better than any compliment I could have asked for.
The Secret to Perfect Swirls
The key to maintaining distinct, beautiful swirls is handling the dough as little as possible once the colors are combined. I learned this the hard way after my first batch where I kept twisting and re-twisting trying to get the perfect pattern, only to end up with muddy brown blobs. Now I do one gentle twist, roll it into a log, and call it done before I can second-guess myself. The imperfect swirls are honestly the ones that look the most charming and real.
Timing and Temperature Matters More Than You Think
These cookies are forgiving about most things, but baking temperature and time are not among them. I've found that even a 25-degree difference in oven temperature can change the outcome from perfect to slightly cakey, so invest in an oven thermometer if you don't have one. The golden rule is to pull them out when the edges are golden but the centers still look slightly underdone, because they firm up beautifully as they cool and stay tender inside.
Make Ahead Magic and Storage Wisdom
This recipe's greatest strength is its flexibility with your schedule, and I've used that to my advantage more times than I can count. You can prepare the swirled dough log up to a week ahead in the refrigerator, or freeze it for up to two months and bake directly from frozen, adding just a minute or two to the baking time. Once baked and cooled, they stay fresh and soft in an airtight container at room temperature for about five days, making them perfect for parties or gift-giving without last-minute stress.
- For extended storage, freeze unbaked slices between parchment sheets so you can bake just as many as you need whenever hunger strikes.
- If you're giving these as gifts, stack them in a pretty box or jar with parchment between layers to keep them from sticking together.
- These cookies freeze beautifully for up to two months, so there's absolutely no shame in making a double batch and saving half for later.
 Save It
 These cookies have become my go-to celebration bake, the one I make when I want to put a little extra magic into someone's day. There's real joy in watching someone bite into these and seeing that moment of delight when they discover the swirled colors inside.
Recipe FAQs
- → What type of coloring is best for vibrant pastel swirls?
Gel food coloring works best as it provides bright hues without altering the dough consistency.
- → How should the dough be handled to achieve marbled swirls?
Divide dough into portions for coloring, tint each evenly, then twist the ropes loosely to create a marbled effect without overmixing.
- → What is the recommended chilling time before baking?
The dough should chill for at least 2 hours to firm up and hold its shape during baking.
- → Can these cookies be stored or frozen?
Store in an airtight container at room temperature for up to 5 days or freeze for up to 2 months.
- → Are there allergen considerations to keep in mind?
These contain wheat, egg, and dairy. Almond extract is optional and may be omitted to avoid nut allergens.