 Save It
 The first time I pressed a sandwich, I was rushing between errands on a Tuesday afternoon, hungry and skeptical that a panini maker could actually improve on what I already knew. But that first bite—the bread crackling between my teeth, the cheese still warm enough to pull in golden strings, the herbs releasing their scent—changed how I thought about lunch entirely. There's something almost meditative about the hiss and steam when the press closes, a sound that promises something better than a cold sandwich waiting in your lap. Now I find myself hunting for combinations, experimenting with whatever looks good at the market, turning what could be ordinary into something that feels special.
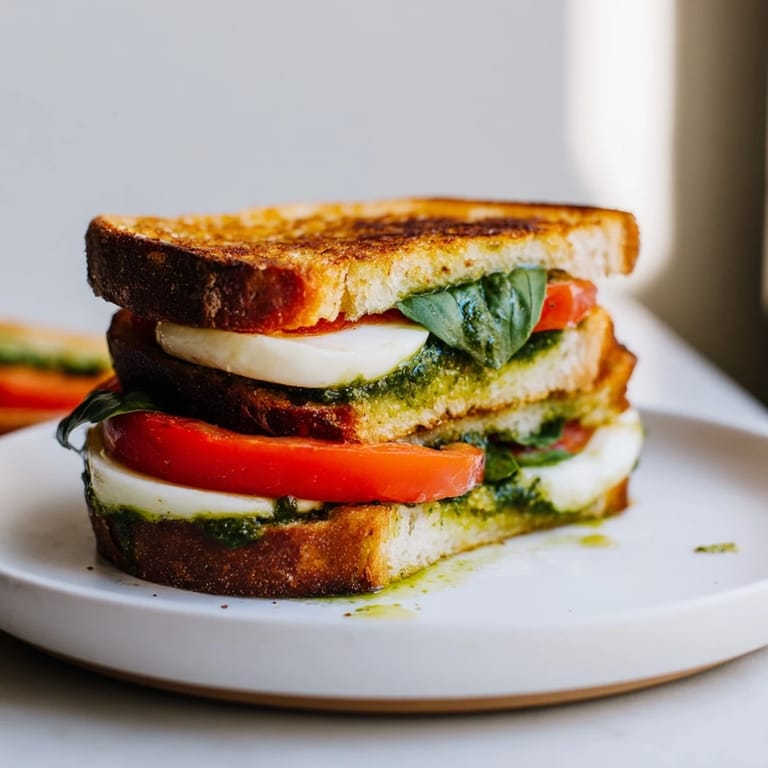
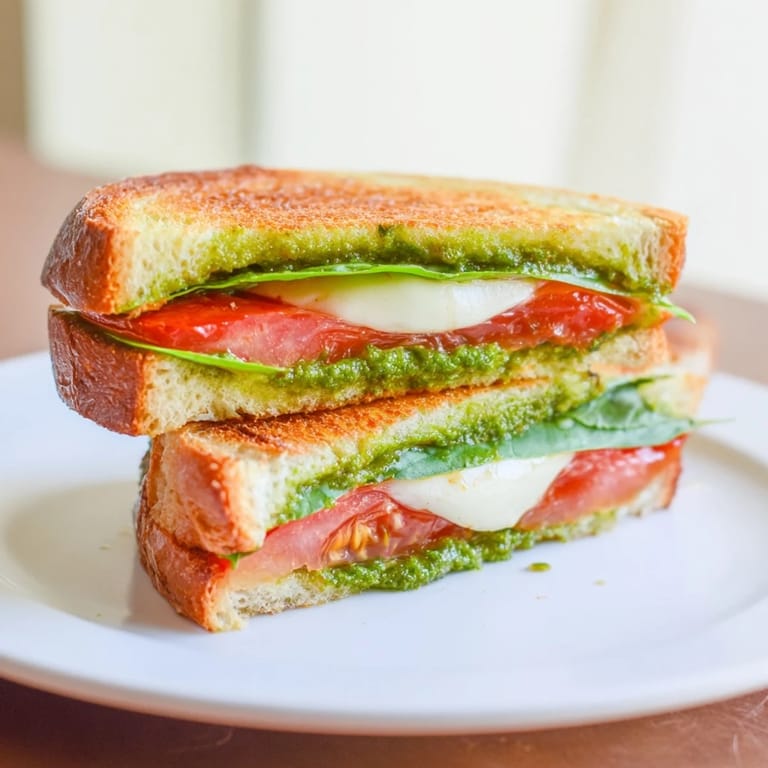
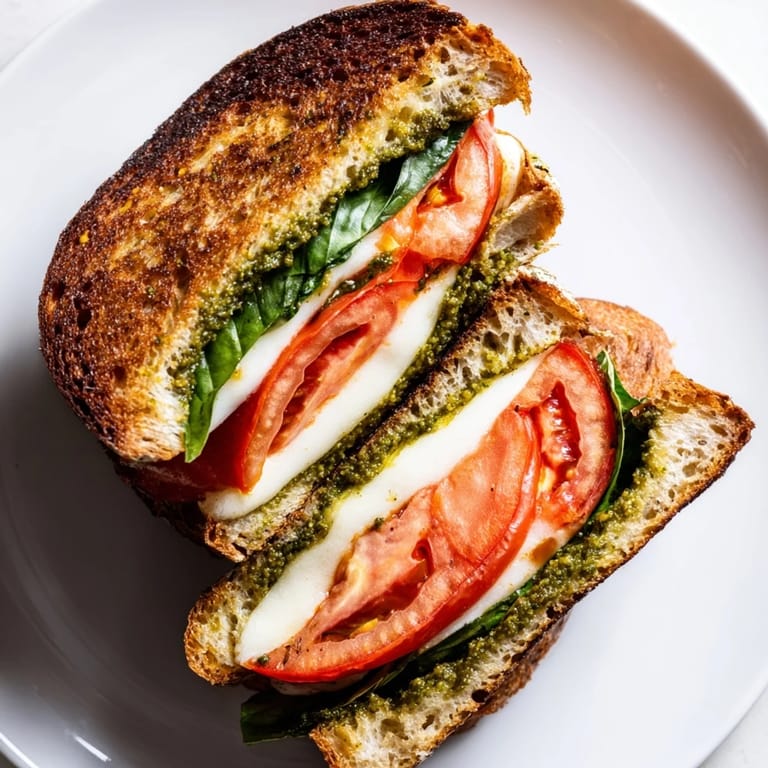
I made the Caprese version for my neighbor last summer when she mentioned she was tired of sad desk lunches, and watching her face when she bit into it—that surprised, delighted expression—made me realize these sandwiches are more than convenience food. They're a small kindness you can hand someone warm, something that tastes like you actually cared about their lunch.
Ingredients
- Sourdough or ciabatta bread: The structure matters here; a soft bread will steam instead of crisp, so look for something with enough structure to stand up to the press.
- Fresh mozzarella: Avoid low-moisture varieties if you can; you want that melting quality that makes cheese worth eating.
- Basil pesto: Homemade is wonderful, but quality jarred works just fine—this isn't a dish that demands perfection.
- Tomatoes: Ripe ones make all the difference, though honestly, a good canned San Marzano works in winter.
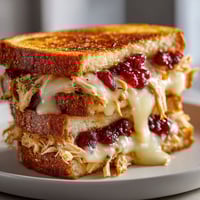
- Turkey breast and multigrain bread: The earthiness of multigrain balances the sweetness of cranberry like they were made for each other.
- Swiss cheese: Its mild nuttiness holds its own against bold flavors without overpowering.
- Grilled eggplant and zucchini: Grill these ahead if you can; the char adds a complexity that raw vegetables just don't have.
- Feta cheese: Crumble it by hand rather than buying pre-crumbled; the texture stays better through pressing.
- Shredded chicken breast: Rotisserie chicken saves time, and honestly, it's more flavorful than boiled.
- Pepper jack cheese: This one carries the heat beautifully, melting into the bread rather than sitting on top.
- Olive oil and butter: Use whichever feels right to you; butter gives more golden crust, oil feels lighter.
Tired of Takeout? 🥡
Get 10 meals you can make faster than delivery arrives. Seriously.
One email. No spam. Unsubscribe anytime.
Instructions
- Heat your press:
- Most presses need just a minute or two, but if yours has a temperature dial, let it fully preheat—a cold press gives you bread instead of a panini. You'll feel the warmth radiating when it's ready.
- Prep and layer:
- Lay both bread slices flat, spread your sauce on the insides, then build your fillings from there. The order doesn't matter much, but keeping cheese toward the bread helps it melt faster.
- Oil the outside:
- Brush or spread the outer surfaces lightly—this is what gives you that beautiful golden crust. Don't skip this step; it's the difference between pressed bread and a proper panini.
- Press with confidence:
- Place the sandwich in the press and close it gently but fully; you want good contact with the heat. Listen for that satisfying hiss—it means things are working.
- Watch for the color:
- Four to six minutes usually does it, but ovens and presses vary wildly. Check at four minutes; the bread should be deep golden and slightly crispy, and if you peek inside, the cheese should be starting to move.
- Rest before you bite:
- Let it sit for thirty seconds after coming out of the press. This sounds unnecessary, but it helps the cheese set just enough that you won't burn the roof of your mouth.
 Save It
 There's a moment when you're standing at the press, listening to it work, smelling the butter and cheese warming, that feels almost like meditation. You're not really doing anything except waiting, but somehow it feels like you're creating something. My kids started asking for these sandwiches instead of whatever I'd normally make, which is maybe the highest compliment a simple lunch can get.
Making Them Your Own
These four combinations are just starting points, really. Once you get comfortable with the technique, you'll start noticing what looks good together—that gorgeous heirloom tomato at the market, the fresh mozzarella that just arrived, a herb you suddenly want to try. The beauty of panini is that there's no wrong way to layer flavors as long as you respect the basic principle: good bread, cheese to bind everything together, and ingredients that actually taste good when they're warm.
Timing and Serving
The whole process from prep to eating takes maybe twenty minutes, which makes these perfect for weeknight dinners when you don't want to think too hard about cooking. Serve them hot, ideally with something cool on the side—a simple salad cuts through the richness beautifully, and a soup turns it into something that feels like real dinner instead of a lunch you happened to eat at night.
Wine and Pairings Beyond Sides
I used to think about wine pairings as something fancy and separate from everyday cooking, but a crisp Pinot Grigio with the Caprese, or a light red with the BBQ Chicken, suddenly makes lunch feel intentional. Even just a cold sparkling water with lemon elevates the whole experience—it's not about being fancy, it's about recognizing that you've made something worth sitting down for. The vegetarian combinations work beautifully with herbal teas or light juices if you prefer.
- Keep extra bread on hand; you'll find yourself making more than you planned once someone tastes the first one.
- Room-temperature fillings press better than cold ones, so let your ingredients sit out for a few minutes if they've been refrigerated.
- A panini press is cheaper than most people think and will earn its space on your counter faster than you'd expect.
 Save It
 These sandwiches are proof that you don't need complicated techniques or exotic ingredients to make something genuinely good. Sometimes the best meals are the ones you throw together from what you have, press until they're golden, and eat standing at the counter because you couldn't wait another second.
Recipe FAQs
- → What breads work best for panini sandwiches?
Sourdough, ciabatta, focaccia, multigrain, and country breads all yield great textures and hold fillings well when pressed.
- → How do I achieve a crispy exterior without burning?
Brush the bread lightly with olive oil or butter and cook for 4–6 minutes until golden. Adjust heat settings to avoid overcooking.
- → Can I customize the fillings for dietary preferences?
Yes, swap meats for additional vegetables or plant-based proteins, and experiment with different cheeses and sauces to suit your needs.
- → What sauces enhance the flavor of panini combinations?
Basil pesto, cranberry sauce, hummus, and BBQ sauce add moisture and depth, complementing various fillings beautifully.
- → How can I serve panini sandwiches for a complete meal?
Pair with simple side salads or warm soups, and consider wine pairings like crisp Pinot Grigio or light reds to elevate the experience.