 Save It
 I stumbled upon this idea while organizing old cookbooks in a friend's kitchen and found a dusty food styling magazine from the nineties. One spread showed what looked like ancient pottery shards arranged on a table, but when I leaned closer, I realized it was actually cheese with herb impressions pressed into it. The whimsy of it stuck with me—turning something as humble as goat cheese into edible archaeology felt like the kind of trick that could make any gathering feel unexpected and thoughtful.
I made this for the first time at a dinner party where I'd promised something "interesting but unfussy." As I pressed the dill fronds into the cheese, my host wandered over asking what catastrophe I was creating. When I showed her the finished plate twenty minutes later, covered in nuts and looking like something from a museum display, she laughed and said it was the most fun appetizer she'd ever seen. That moment—the laughter before the bite—is what this dish is really about.
Ingredients
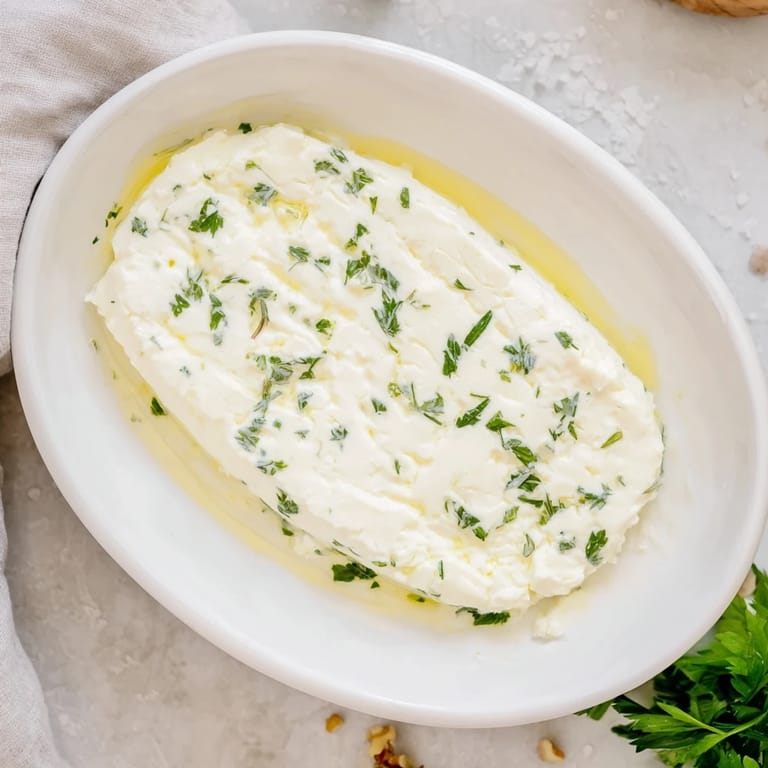
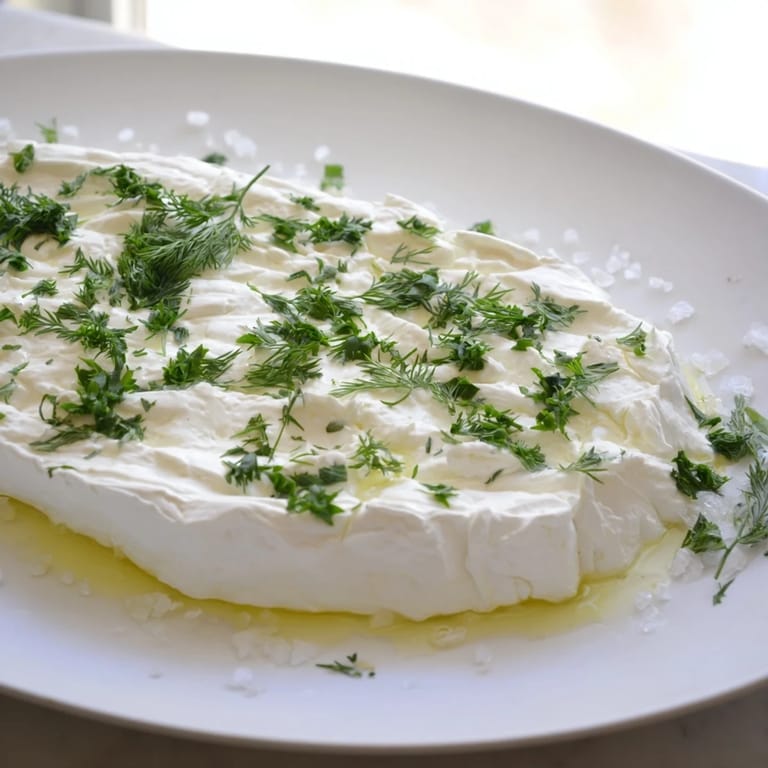
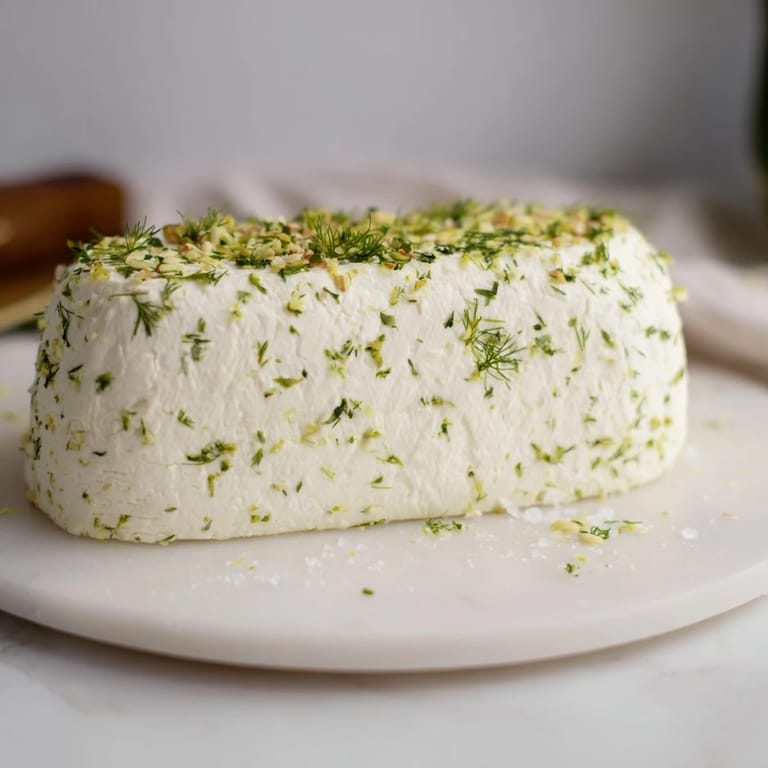
- Soft cheese (250 g / 9 oz): Goat cheese has the perfect tang, cream cheese adds richness, and ricotta brings a delicate texture; choose based on what you want the cheese to say when someone tastes it.
- Fresh herbs (1 small bunch): Parsley creates sharp impressions, dill makes feathery patterns, and cilantro or chervil add unexpected flavor notes; mix them for deeper detail.
- Olive oil (1 tbsp, optional): A light brush gives the cheese a subtle sheen and helps it feel intentional rather than rustic.
- Assorted nuts (100 g / 3.5 oz): Leaving shells on some pieces adds to the archaeological feel; a mix of textures keeps the eye moving across the plate.
- Sea salt (1/2 tsp, optional): A whisper of salt heightens the cheese and makes the whole thing taste more sophisticated than it actually is.
Tired of Takeout? 🥡
Get 10 meals you can make faster than delivery arrives. Seriously.
One email. No spam. Unsubscribe anytime.
Instructions
- Prepare your canvas:
- Line a small tray or plate with parchment paper so the cheese doesn't stick and you can move it without stress. This is your base camp for the whole project.
- Spread and shape:
- Spread the soft cheese about 2 cm thick into a rough oval or round shape, smoothing the top with a spatula until it feels intentional but not precious. Imperfection is part of the charm here.
- Press the fossils:
- Gently press fresh herb sprigs, leaves, or fronds into the cheese surface, then carefully lift them away to reveal detailed impressions. Work slowly and let the herbs do the work rather than forcing them.
- Add sheen (optional):
- Lightly brush the cheese surface with olive oil for a subtle gleam that catches the light. This step separates "something I made" from "something I designed."
- Scatter the surroundings:
- Arrange cracked nuts around the cheese, scattering some shell fragments for an ancient, archeological look. Think like you're staging a dig site.
- Final touches:
- Sprinkle with sea salt if desired, then step back and look at it. You've just made something that looks like it belongs in a gallery. Serve immediately with crackers or bread, or refrigerate until ready to serve.
 Save It
 I served this at a gathering where a five-year-old asked if the cheese was "real ancient." Her grandmother bent down to look closer, and suddenly the whole table was gathered around the plate like it was an actual excavation site. That's when I understood that food sometimes works better as a conversation starter than as sustenance, and this dish does both at once.
Playing with Impressions
The beauty of herb pressing is that it's forgiving and surprising in equal measure. Edible flowers create delicate patterns that look like tiny fossils, while small edible leaves can be layered for depth. I once used microgreens and got impressions so intricate they looked professionally designed. The thing I've learned is that whatever you press will leave a mark—some will be bold, others faint—and they're all interesting in their own way.
Customizing the Pairing
This cheese works beautifully with crispy crackers that provide contrast, but it's also stunning with soft fresh bread that lets the cheese shine. A drizzle of honey adds sweetness that surprises people in the best way, and fruit preserves create a sweet-savory moment. I've found that whatever you serve alongside should feel intentional, like you chose it specifically for this dish rather than grabbing whatever was in the pantry.
Making It Work for Everyone
The vegetarian and gluten-free nature of this appetizer means it arrives at the table already inclusive, which feels quiet but deliberate. For a vegan version, plant-based soft cheeses work just as well and create equally striking impressions. The nut selection can shift based on allergies and preferences, so you're never locked into one version of this dish.
- Make it ahead and refrigerate for up to four hours, then bring it to room temperature fifteen minutes before serving.
- If you're worried about presentation, remember that slight imperfections add to the handmade, thoughtful quality.
- Pair it with white wine like Sauvignon Blanc, which cuts through the richness of the cheese and complements the herbs.
 Save It
 This dish taught me that appetizers don't need to be complicated to feel special—sometimes the most memorable ones are the ones that make people smile before they even taste them. Keep it simple, trust the ingredients, and let the visual story do half the work.
Recipe FAQs
- → What types of soft cheese work best for this dish?
Soft cheeses like goat cheese, cream cheese, or ricotta are ideal for easy imprinting and creamy texture.
- → How do you create the herb imprints on the cheese?
Press fresh herb sprigs or leaves lightly into the cheese surface, then carefully lift them to leave detailed patterns.
- → Can this be prepared ahead of time?
Yes, it can be refrigerated until ready to serve, keeping the shapes intact and flavors fresh.
- → What nuts are suggested for the rustic accompaniment?
Use a mix of walnuts, pecans, almonds, or hazelnuts, ideally cracked or in shell for texture and appearance.
- → Are there variations to these herb imprints?
Edible flowers or small leaves can be used to make unique fossil-like designs on the cheese surface.
- → Is olive oil necessary when preparing this dish?
Olive oil is optional but can add a subtle sheen to the cheese, enhancing its visual appeal and flavor.