 Save It
 My daughter pressed her nose against the bakery window every Easter, mesmerized by a coconut-covered bunny cake that cost more than I wanted to spend. One spring, I decided to recreate it at home, and what started as an ambitious project turned into the most joyful afternoon in our kitchen—flour dusting everything, her tiny hands pressing coconut onto frosting, laughter filling the room. That first bunny cake wasn't perfect, but it was ours, and somehow that made it taste infinitely better than any store-bought version ever could.
I'll never forget when my son's friend asked if the bunny was real before we cut into it—she'd convinced herself we'd somehow baked an actual animal. Watching their faces light up as the cake turned into servings, seeing frosting smeared on cheeks and coconut stuck in hair, reminded me that holidays aren't about perfection. They're about these small, silly moments that become the memories kids carry forward.
Ingredients
- All-purpose flour (2 1/2 cups): The foundation that keeps this cake tender—don't skip sifting it with the leavening agents, as it prevents lumps that would throw off your rise.
- Baking powder and baking soda (2 1/2 tsp and 1/2 tsp): This combination lifts the cake properly, but don't double them thinking more rise equals better—you'll end up with a soapy taste and a cake that deflates.
- Unsalted butter (1 cup for cake, 1 cup for frosting): Room temperature butter creams properly and gives you that light, fluffy crumb; cold butter won't incorporate air no matter how long you beat it.
- Granulated sugar (1 3/4 cups): This sweetens the cake but also helps trap moisture, keeping each bite tender even days later.
- Eggs (4 large, room temperature): Room temperature eggs emulsify smoothly into the batter, creating structure; cold eggs can cause your mixture to curdle and separate.
- Vanilla extract (1 tbsp for cake, 2 tsp for frosting): Use real vanilla if you can—the depth of flavor transforms this from good to genuinely memorable.
- Whole milk (1 cup): Adds moisture and a subtle richness that makes the crumb feel luxurious rather than dense.
- Powdered sugar (4 cups, sifted): Sifting it beforehand prevents lumps in your frosting that feel grainy on the tongue.
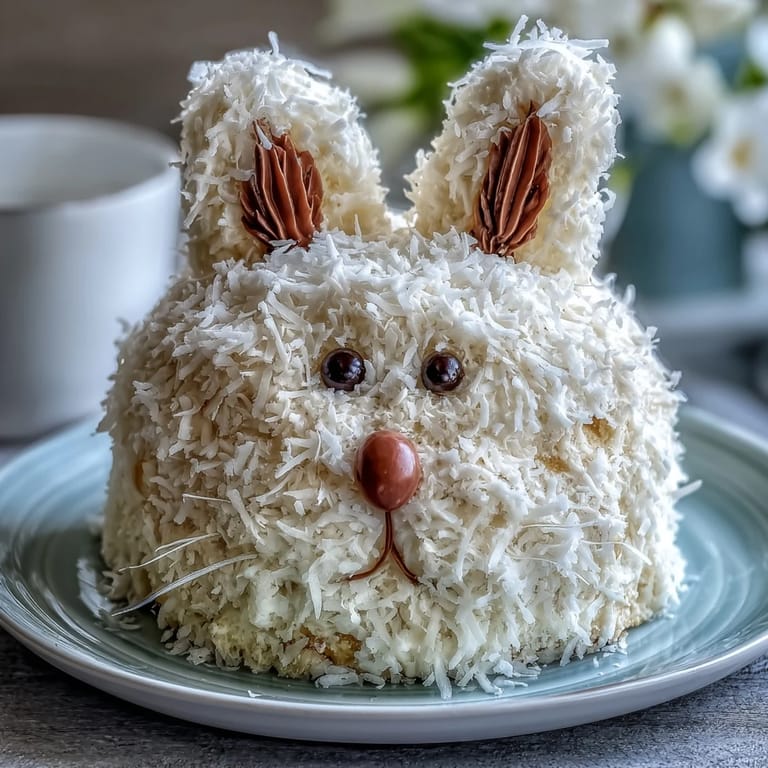
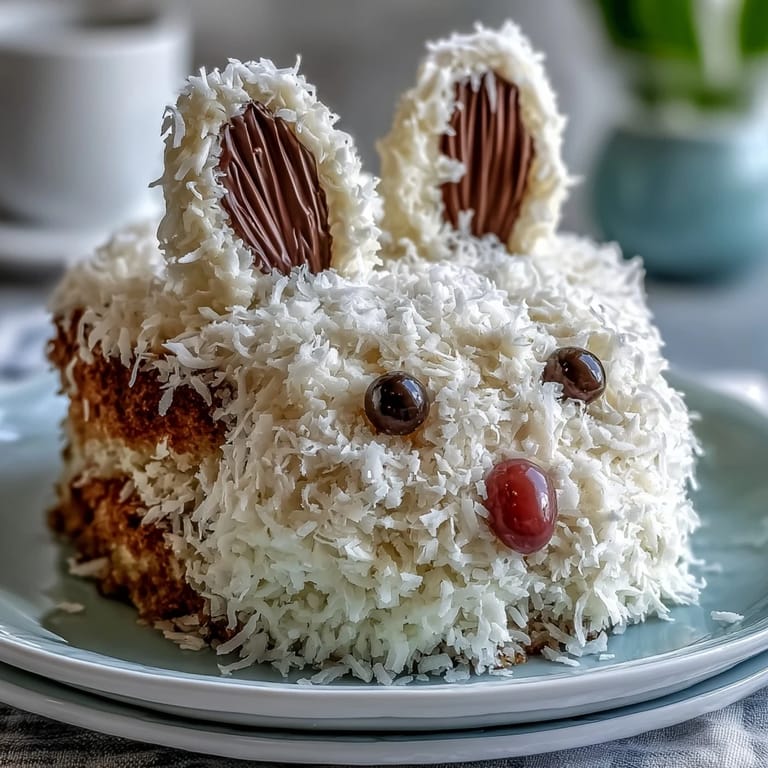
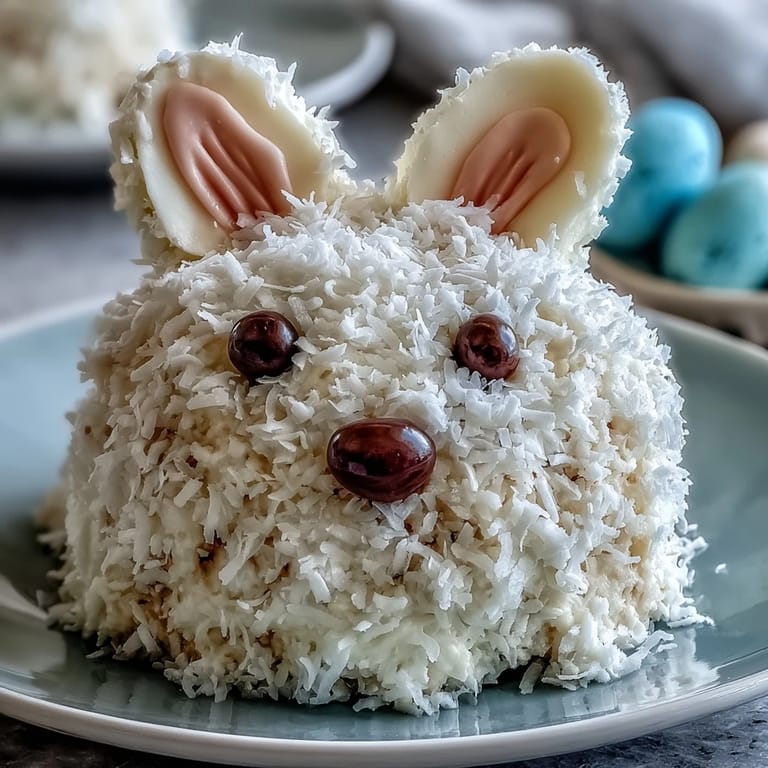
- Sweetened shredded coconut (2 cups): The star of the show—this becomes the bunny's fur, so choose coconut that's fine enough to cling to frosting but not so fine it becomes dust.
- Jelly beans (1 large pink, 4 white, 4 small pink, 2 black or chocolate chips): These are your decorative palette, so pick colors that appeal to you; some people use candies that match their kitchen aesthetic.
Tired of Takeout? 🥡
Get 10 meals you can make faster than delivery arrives. Seriously.
One email. No spam. Unsubscribe anytime.
Instructions
- Prepare your workspace:
- Preheat your oven to 350°F and grease those cake pans thoroughly with butter, then dust with flour—this step prevents sticking disasters that ruin all your careful work.
- Combine the dry ingredients:
- Whisk together flour, baking powder, baking soda, and salt in a medium bowl, breaking up any lumps you spot. This ensures even distribution so every bite has consistent rise and flavor.
- Cream butter and sugar:
- Beat softened butter with sugar until the mixture looks pale, fluffy, and almost mousse-like—this usually takes 3 to 4 minutes. This step incorporates air into the batter, which is what creates that tender crumb you're after.
- Add eggs and vanilla:
- Add eggs one at a time, beating well after each addition so they emulsify properly into the butter mixture. Pour in the vanilla and mix until combined, but don't overbeat once everything comes together.
- Alternate wet and dry:
- Add about a third of the flour mixture, then half the milk, then another third of flour, then the rest of the milk, finishing with the final flour portion. This method prevents overmixing and keeps your cake tender rather than tough.
- Bake the cakes:
- Divide batter evenly between pans and bake for 30 to 35 minutes, until a toothpick inserted in the center comes out clean or with just a few moist crumbs. The smell of vanilla and butter filling your kitchen is the signal you're close.
- Cool with patience:
- Let cakes rest in their pans for 10 minutes—this prevents them from cracking when you turn them out—then transfer to a wire rack to cool completely. Frosting warm cake melts into puddles, so this waiting period is non-negotiable.
- Make your frosting:
- Beat softened butter until it's creamy and pale, then gradually add sifted powdered sugar so you don't end up with sugar clouds flying everywhere. Add vanilla and milk a little at a time until the frosting reaches a spreadable consistency that's not too stiff.
- Assemble the bunny body:
- Place one whole cake round on your serving platter as the bunny's body. Cut the other cake round in half and stand those two semicircles upright at one end, securing them with frosting to create the head and back.
- Shape the ears and paws:
- From any remaining cake scraps or carefully carved sections, cut two elongated ear shapes and four paw shapes using a sharp serrated knife. Attach these pieces to the bunny using frosting as your edible glue.
- Frost generously:
- Apply a thick, even layer of frosting over the entire bunny shape, covering all the seams where pieces meet. This frosting layer becomes the sticky surface that holds your coconut fur in place.
- Add the coconut fur:
- Working in sections, press shredded coconut firmly onto the frosted cake until it's completely covered and looks fuzzy. The coconut clings best when the frosting is still slightly tacky, so don't wait too long between frosting and decorating.
- Decorate with details:
- Place the large pink jelly bean at the bunny's rear for the tail, arrange white jelly beans on each paw and top them with pink ones for paw pads, and press chocolate chips or black jelly beans into the head for eyes. If you want pink ear details, toss some coconut with a tiny bit of pink food coloring before pressing it onto the ears.
- Chill before serving:
- Refrigerate the finished cake for at least an hour so the frosting sets and the structure solidifies. This also gives you time to take a photo before everyone descends on it with forks.
 Save It
 Years later, my daughter still requests this bunny cake for her birthday instead of going to a bakery. What began as me trying to recreate something from a window display became a tradition, and now she helps me shape and decorate it, passing the joy forward to her younger cousins. That's when I realized this recipe was never really about the cake—it was about creating an edible reason to gather, laugh, and make memories together.
Flavor Variations to Try
The vanilla cake is lovely on its own, but this base is wonderfully flexible. Adding a teaspoon of almond extract to the batter gives it a subtle, sophisticated flavor that pairs beautifully with the sweet frosting, while a tablespoon of fresh lemon zest mixed into the batter creates a brighter, spring-forward taste. Some bakers swear by a touch of orange extract for Easter, which feels festive without being overwhelming. The frosting accepts additions too—a tablespoon of melted white chocolate stirred in adds richness, or a half-teaspoon of peppermint extract transforms this into a spring version of a holiday favorite.
Shortcuts Without Sacrificing Joy
If time is tight or baking from scratch feels daunting, there's absolutely no shame in using quality store-bought cake mix and frosting—the decoration and assembly are where your creativity shines anyway. Two boxes of white or vanilla cake mix baked in round pans follow the same assembly instructions, and a good-quality canned frosting takes beautifully to coconut and jelly bean decoration. Your bunny will look just as impressive, taste nearly as good, and what matters most—the time spent assembling it with loved ones—remains unchanged. Some years I've used shortcuts, some years I've baked from scratch, and both versions created memories equally.
Make It Work for Your Needs
This recipe is genuinely accommodating to dietary needs if you're willing to swap intelligently. Gluten-free all-purpose flour works beautifully when you use a blend with xanthan gum already mixed in, though your cakes might be slightly denser—add an extra tablespoon of milk to compensate. Egg-free bakers can use three large eggs plus three tablespoons of aquafaba (the liquid from canned chickpeas) mixed with a tablespoon of cornstarch as a binder. Dairy-free swaps are trickier but possible: use plant-based butter for the cake and frosting, unsweetened oat milk instead of dairy milk, and make sure your jelly beans don't contain gelatin if that's a concern.
- Always test a small batch of substitutions before committing your entire cake to an unfamiliar ratio or ingredient swap.
- Document what worked and what didn't so future bakes improve with each attempt.
- Remember that homemade always tastes like love, regardless of whether it's gluten-free, dairy-free, or made exactly as written.
 Save It
 This bunny cake teaches you something beyond baking—it shows you that food shaped with intention and love lands differently in people's hearts. Every Easter now, I get messages from friends who made their own versions, and I love seeing how their bunnies look wildly different from mine, each one a reflection of their kitchen, their creativity, their love. Make this cake, and it becomes your own.
Recipe FAQs
- → How is the coconut used in decorating the cake?
Sweetened shredded coconut is pressed over the frosted cake to resemble soft bunny fur, creating a fluffy texture.
- → What creates the bunny’s tail on the cake?
A large pink jelly bean is placed on the cake to serve as the colorful bunny tail.
- → Can I prepare this cake in advance?
Yes, the cake can be baked and decorated a day ahead. Keep it refrigerated and covered to maintain freshness.
- → What tools are needed for shaping the bunny features?
A serrated knife is used to cut cake rounds into ears and paws, which are attached using frosting.
- → Are there gluten-free alternatives for this cake?
Yes, substituting all-purpose flour with gluten-free flour allows adaptation for gluten sensitivity.
- → How do the jelly beans enhance the cake’s appearance?
Colored jelly beans create details like the bunny’s paws and tail, adding bright, playful accents.